


Yep — if you’re diving into Black Ops 7 Zombies, you’ve probably wondered which weapons, perks, and support tools are actually worth your time. The game gives tons of options, and not all of them are equally effective when chasing high rounds or trying to survive long sessions.
No worries — this BO7 Zombies Tier List breaks it down in detail. It’s friendly, accurate, and covers everything from solo survival to team strategies.
By the end, you’ll know which gear to prioritize, which perks are worth farming, and how to make the most of your loadout in BO7 Zombies.
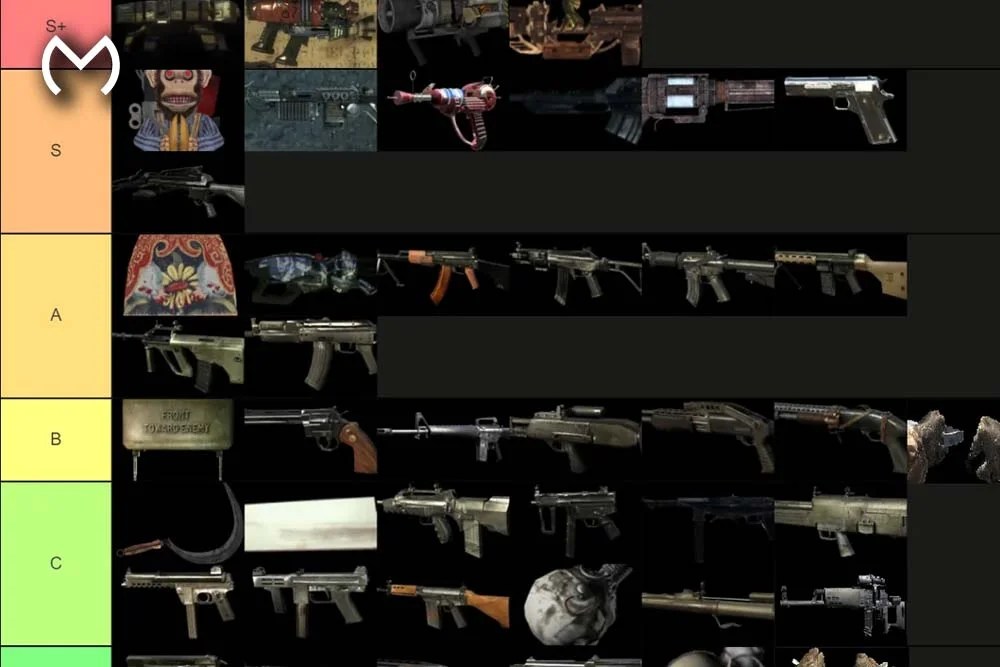
How the Tier List Works
A tier list organizes items by effectiveness and reliability in Zombies matches. Categories are:
- S Tier: Must-have items that perform excellently in nearly every scenario.
- A Tier: Strong items; reliable in most situations.
- B Tier: Situational; useful only in specific circumstances.
- C Tier: Weak or low-impact items; only use if nothing better is available.
This system helps you make smart choices for weapons, perks, and support tools, whether playing solo or in a squad.
Weapons Tiering in BO7 Zombies
Weapons are the backbone of any Zombies run. Here’s the breakdown:
S Tier Weapons
- Fully automatic rifles with high ammo efficiency.
- Shotguns that excel in crowd control.
- Heavy machine guns for holding choke points.
These weapons shine in most situations. High fire rate and consistent damage make them essential for both early and late rounds.
A Tier Weapons
- Semi-automatic rifles and precision weapons.
- Mid-tier shotguns.
- Handguns with specific upgrades.
Perfect for secondary roles, early rounds, or backup during emergencies.
B Tier Weapons
- Single-shot rifles with low ammo capacity.
- Specialty weapons that require resource farming.
Good for experimentation or when high-tier gear isn’t available.
C Tier Weapons
- Early-game pistols or underpowered throwbacks.
- Weapons with poor crowd control or limited ammo.
Mostly for novelty runs or if nothing else works.
Perks Tiering
Perks are critical for survivability. Here’s how they stack up:
S Tier Perks
- Perks boosting health and movement speed.
- Ammo efficiency and reload speed perks.
A Tier Perks
- Damage boosters.
- Utility perks that improve traps or environmental interactions.
B Tier Perks
- Melee-focused perks.
- Short-term buffs useful only in niche situations.
C Tier Perks
- Perks that don’t scale well to high rounds.
Support Tools and Equipment Tiering
Support items include grenades, deployables, crafting tools, and utility devices.
S Tier
- Area-denial grenades that control crowds.
- Defensive deployables for choke points.
- Long-duration utility tools that help sustain survivability.
A Tier
- Fast-use explosives for emergencies.
- Mobility aids for high-round map traversal.
B Tier
- Situational gadgets for specific scenarios.
- Short-range utilities that require careful timing.
C Tier
- Single-use items with minimal impact in high rounds.
For players focusing on thematic, zombie-oriented survival, unlocking the Infestation Camo perfectly complements Aether-focused builds and enhances your loadout visuals.
Team and Solo Strategies Using the Tier List
How you use the tier list depends on your playstyle:
- Solo: Focus on S-tier weapons, mobility perks, and defensive tools to maximize survivability.
- Team: Distribute S- and A-tier items across the squad. Not every player needs the same loadout.
A well-balanced team with a mix of S- and A-tier options consistently outperforms a squad where everyone uses identical S-tier gear.
For players exploring all BO7 progression options, the full Black Ops 7 hub provides comprehensive information on weapons, perks, camos, and tools.
Map Considerations
Map layout influences which items are most effective:
- Tight corridors favor shotguns and area-denial tools.
- Open spaces benefit fully automatic rifles and heavy machine guns.
- High-mobility perks are essential for maps with vertical or sprawling layouts.
Choosing weapons and perks that align with your map’s flow drastically improves your odds of surviving later rounds.
High-Round Tips Using the Tier List
- Rotate your gear depending on wave progression.
- Save rare resources for late-game weapon upgrades.
- Stockpile backup tools and deployables in early rounds.
- Mix high-tier weapons with situational tools to maintain flexibility.
Advanced Loadout Tips
- Combine S-tier weapons with supportive perks for maximum efficiency.
- Keep a balance between area control tools and high-damage weapons.
- Prioritize items that scale well into higher rounds rather than early-game bursts.
- Swap items based on zombie spawn patterns, map layout, and team roles.
Why Using a Tier List Matters
- Helps prioritize which weapons and perks to upgrade first.
- Increases survival rates in high rounds.
- Makes co-op strategy more predictable and effective.
- Saves time by focusing on high-impact items instead of trial-and-error.
Conclusion: BO7 Zombies Tier List
This BO7 Zombies Tier List gives a complete framework to make informed choices in every run. From S-tier weapons and perks to situational B-tier support tools, understanding this hierarchy improves your survivability, strategic planning, and overall enjoyment of Black Ops 7 Zombies.
All good — with this guide, your loadouts will be optimized, your perks well-selected, and your team better prepared for any challenge the Dark Aether throws at you.


