


Best BO7 Rush Routes on Launch Maps
If you’re searching for the best BO7 rush routes on launch maps that help you win the opening fight, secure objective control, and set map tempo early — yep, you’re exactly where you should be. Black Ops 7’s launch maps are built around three-lane predictable movement principles, but what makes the game tactical is how fast players can take early space and shut down rotations before they even develop.
Whether you’re an SMG entry player, an AR lane-holder, or a support player controlling mid-map, knowing the right rush routes makes a massive difference in early momentum, kill streak timing, and objective control.
This guide walks through how rush routes work, how spawns influence your options, and how to select the perfect route for your playstyle on BO7 launch maps.
How Rush Routes Influence BO7 Match Flow
Rush routes aren’t just early movement patterns. They determine:
- First kills
- First power position
- First map control
- First objective dominance
- First spawn lock attempt
The player who wins the opening gunfight is often the player who:
- Took the angle early
- Used movement smartly
- Cut off the enemy’s fastest line
- Arrived pre-aimed
Rush routes are not only offense; they set defensive foundations for the next 60 seconds of gameplay.
Understanding Spawn-Based Rush Strategy
Before sprinting off, players need to understand how spawns influence rush potential. BO7 spawn logic favors safety and balance — pushing too deep too fast can flip spawns unintentionally.
Rush routes consider:
- Teammate distribution
- Where enemies are likely sprinting
- Whether objectives open diagonally or straight ahead
- Where cover is accessible in the first two seconds
If your team stacks one lane, expect opponents to flood another.
If you push too deep and flip spawns early, you might lose objective control — even after winning the first gunfight.
Best BO7 Rush Routes on Launch Maps: General Principles
While each BO7 map has a unique structure, rush fundamentals are consistent.
For SMG Players
- Use side lanes
- Slide into headglitch cover
- Avoid mid-open exposure
- Force straight-line gunfights
SMGs win when fights happen fast — not when crossing sightlines.
For AR Players
- Use mid-cut lanes
- Pre-aim long corridors
- Anchor near half-wall or head-high cover
- Control rotation choke points
ARs win by slowing the enemy’s route, not outrunning it.
For LMG Players
- Position to suppress
- Set up behind long-range cover
- Delay pushes with sustained fire
LMGs aren’t first to the fight — but they decide if enemies get past it.
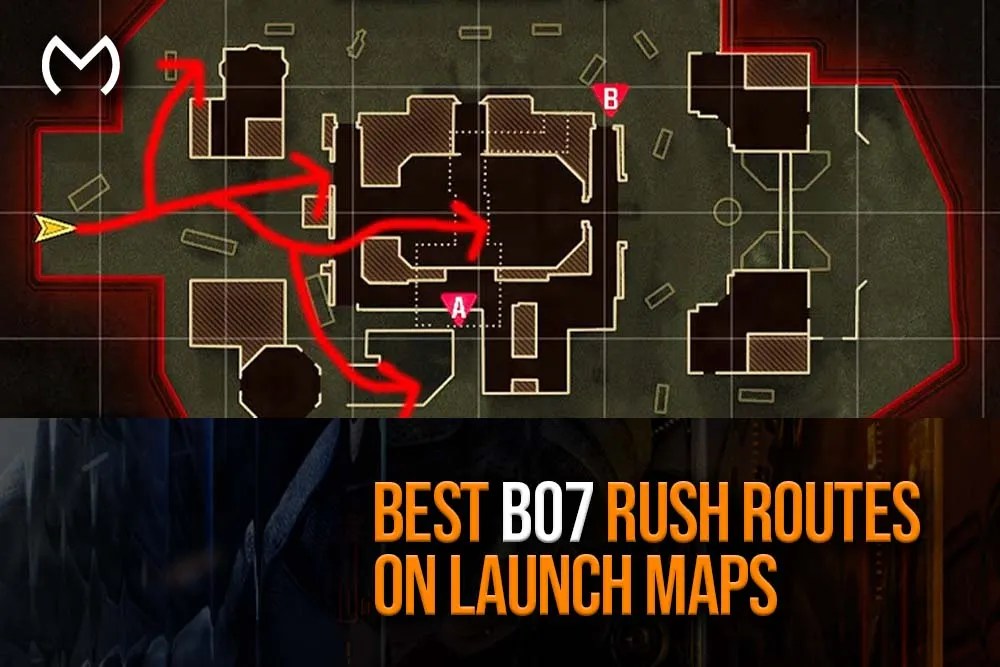
Rush Routes Built Around Three-Lane Map Design
BO7 launch maps generally follow:
- Left lane (close-range)
- Middle lane (high danger/high reward)
- Right lane (power position or long lane)
The Best Rush Routes Usually Include:
| Lane | Ideal Class | Strength |
| Left | SMG | Fast pushes and surprise angles |
| Mid | AR / Quick SMG | Control and cutoffs |
| Right | AR / Marksman | Lane dominance |
Controlling two of three lanes is the unofficial rule for early map dominance.
Rush Route Types and When to Use Them
1. Pure Speed Rush
Purpose: Get to the angle first
Best for: SMG players
This route takes:
- The fastest side lane
- Slide-cancel entries
- Early corner ADS
Risk: You’re exposed if enemies pre-fire.
Reward: Free kill if they’re late.
2. Cutoff Rush
Purpose: Kill enemies mid-transition
Best for: AR players
Rather than running straight to the objective, you intercept the fastest enemy route.
Risk: Requires pre-aim discipline
Reward: Stops their rush before it escalates
3. Anchor Rush
Purpose: Stop the spawn flip and remain back-line
Best for: AR/LMG
This isn’t flashy — but it wins the long game.
Risk: Less early slaying
Reward: Total spawn stability
How Objectives and Rush Routes Connect
Hardpoint and Domination change rush value dramatically.
In Hardpoint
Route choice decides:
- Who wins the first hill
- Who controls second rotation
- Whether your team must break or defend
Rotating early is often better than rushing blindly.
In Domination
Rushing mid is common — which is why most teams die there fast.
Smart teams:
- Take mid only after securing a side lane
- Push in pairs
- Avoid predictable center pushes twice in a row
BO7 rewards teams that break rhythm, not repeat patterns.
Pairing Rush Routes With Recon Information
Rush routes become stronger when players combine them with early intel.
Using UAV sweeps or recon devices is part of competitive early-game strategy — especially when predicting second-lane pushes.
If you’re exploring other BO7 mechanics, tactical tools, or services, you can reference the full Black Ops 7 hub to build broader strategy.
When NOT to Rush in BO7
Rushing is high-impact — but wrong timing ruins it.
Do not rush when:
- Your team is split
- You lost last engagement badly
- The objective is rotating behind you
- Opponents predict your lane pattern
- You have no tactical stun/flash advantage
Rushing isn’t speed — it’s initiative management.
Best Situational Rush Strategies
Rush After Breaking Armor
If you poke an enemy and deal damage, finish fast — don’t let them heal.
Rush After Tactical Hits
A stunned enemy is a slow target — rush instantly, not after a delay.
Rush When You Hear Reload
Sound cues are free information — use them.
Rush When Enemy Spawns Flip
Cut them off — not chase them.
Advanced Rush Route Concepts
Soft Shoulder Peeking
Peek small angles — deny full hitbox exposure.
Late Route Delay
Pause at the start → catch enemies pre-aiming wrong lane.
Fake Pressure Rush
Make noise in one lane
Rotate silently to another
Punish their reposition
The best rush isn’t always fast — sometimes it’s disguised.
Best BO7 Rush Routes on Launch Maps — Final Thoughts
So yep — understanding the best BO7 rush routes on launch maps isn’t about running as fast as possible. It’s about controlling tempo, knowing which lane benefits your class, using sound, anticipating angles, and adapting when opponents learn your patterns.
Smart rushers don’t repeat mistakes, don’t challenge predictable lines twice, and don’t rush without purpose. Winning the early fight is great — winning map control is better.


